There have been few online questions regarding enabling MySites interoperability with ADFS. To answer the question if it’s possible, yes.
The process is actually very simple and similar to configuring forms based auth in MOSS 2007.
So it’s probably safe to assume, by this time you’ve already completed the step-by-step guide for enabling MOSS 2007 as a claims aware application; therefore this post is a walkthrough on how to configure the Web Single Sign-On authentication to interoperate with MySites.
Assuming you already have a functional claims-aware instance of MOSS 2007 configured, when logged in as a federated user you should see that the MySites link is missing. The reason for that is MySites is tied to the Shared Service Provider which has not yet been extended to use the Web Single Sign-On (SSO) authentication provider.
In order for federated users to have access to MySites, Web Single Sign-On needs to be configured to interoperate with My Site applications.
For simplicity sake, this walkthrough assumes the MySites collection is within the same web application of the site to which they are associated. For example, https://<sharepointserver>/mysites. The recommended design from Microsoft is to have MySites as its own web application and managed independently. I’m lazy and only have a VM to prove my point, so here it is. Recommended designs for MySites should be referenced in the best practice documentation in TechNet.
Within Central Admin:
1. When first configuring your Shared Service Provider, you probably configured it under the Default zone with NTLM authentication. Extend the SSP web application to use an additional authentication provider and assign it to the Custom or Extranet) zone. (Note: Zones identify the logical separation of access restrictions to the same content.) Be sure to include the details such as port number where the new application will be hosted in and choosing the zone that this extended Web application will reside under. In my case, I extended the web application under my existing federated URL, http://extranet.treyresearch.com:<port>.
2. Configure the authentication provider of this extended web application for Web Single Sign-on (SSO). Be sure to specify the Membership Provider Name as [SingleSignOnMembershipProvider2] and Role Manager Name as [SingleSignOnRoleProvider2].
3. At this point, add a provider section to the Web.config of the extended Web application. This would virtual directory for the SSP (C:\Inetpub\wwwroot\wss\VirtualDirectories\<port number of SSP>. The following snippet should be copied and pasted under the <system.web> node within the web.config.
<membership>
<providers>
<add name="SingleSignOnMembershipProvider2" type="System.Web.Security.SingleSignOn.SingleSignOnMembershipProvider2, System.Web.Security.SingleSignOn.PartialTrust, Version=1.0.0.0, Culture=neutral, PublicKeyToken=31bf3856ad364e35" fs="https://fs.treyresearch.com/adfs/fs/federationserverservice.asmx" />
</providers>
</membership>
<roleManager enabled="true" defaultProvider="AspNetWindowsTokenRoleProvider">
<providers>
<remove name="AspNetSqlRoleProvider" />
<add name="SingleSignOnRoleProvider2" type="System.Web.Security.SingleSignOn.SingleSignOnRoleProvider2, System.Web.Security.SingleSignOn.PartialTrust, Version=1.0.0.0, Culture=neutral, PublicKeyToken=31bf3856ad364e35" fs="https://fsserver/adfs/fs/federationserverservice.asmx" />
</providers>
</roleManager>
Be sure to update the <fsserver> name to reflect the web service URL of the federation server. Do an “iisreset” for the configuration to take place.
4. When you’ve completed this task, the People Picker should be able to resolve organizational claims for this web application using the SingleSignOnMembershipProvider2 membership provider.
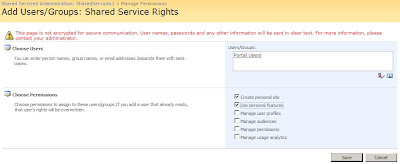
5. Assign your federated users Personalization services permissions. Do this by browsing the SSP Admin Site: <ssp name> User Profiles and My Sites Personalization service permissions. Using the Add Users/Group link you can enter the name of your organizational claims representing your portal users. Hit the Check Names button and watch the name resolve.
Grant the following rights to the users, (1) Create personal site and (2) Use personal features.
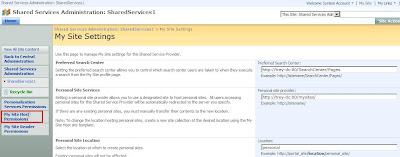
6. The next step is to grant federated users permissions to the MySites Host. Within the SSP Admin site, navigate to SSP Admin Site: <ssp name> User Profiles and My Sites My Site settings, then within View All Site Content My Site Host Permissions.
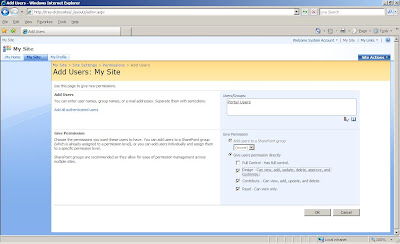
7. Add your organizational claim that represents your federated users. You actually create a claim that defines the various types of users and set their rights here. For example, Portal Admins and Portal Users.
8. Typically you wouldn’t want to assign other users Read permissions to other users to view public areas of MySites. The default behavior grants NT AUTHORITY\authenticated users to read other users MySites. You have to grant the organizational claim representing your federated users here. Browse to your SSP Admin Site, SSP Admin Site: <ssp name> User Profiles and My Sites My Site settings. Within the Default Readers Site Group, add the organizational claim here.

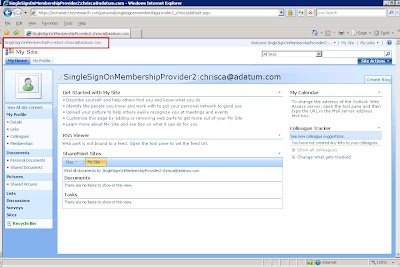
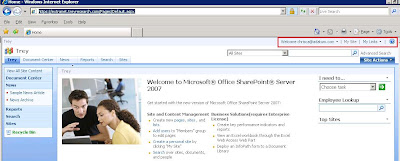
9. Now test the configuration from the client computer within the account partner. Browse to https:/extranet.treyresearch.com which should authenticate you through the federated trust. The first thing you should notice is that the MySites link is now available.
10. When you click it, your site is created!